Wednesday 14 December 2011

Sorry for the wait

Wow such a long time since I have been on, and not a great start to the "supposedly" consistent posts...but I have been doing lots....just haven't got it up yet.

Am making some bath bombs as gifts for ladies and kidlets at my Xmas party coming up and just had to share this great site Craft Bits with fabulous recipes for DIY crafts of all sorts including sherbet bath bombs, bath icecream, it all looks so good, even the bath cuppacino!!!! Wouldn't be wanting this at nighttime, but if you are an early riser, what a treat to soak in a cuppacino bath before the day begins.....

Or what about this Pina Colada bath bomb...might get you in the mood for partying...

Bath Salt - Pina Colada

Image for Bath Salt - Pina Colada DIY Craft Project
 
For all the recipes visit this site ...Craft Bits

Wednesday 28 September 2011

Apothecary jars amore!!!

In a quick clean up to welcome my brother and sister-in-law with their sweeties yesterday, I found an old salsa jar, and knew it would look great as an apothecary jar.  I used a candlestick holder from Vinnies for the base and the top....well I broke off a bit of bling off an old old candlestick holder I had....

So here it is.
                                                                   Before:


                                                            After:


What goodies shall I put in this one........!!!!  It is too cute for stationery items at the command station.....

Monday 26 September 2011

Tip Me Tuesday

I have been following Tip Junkie for many months now and think it is possibly the best website ever, considering the amount of wonderful tips and linkups on it.  I hope you check it out at Tip Me Tuesday


I am linking up today for the first time!!!! Can't wait.

Think I will do the apothecary lolly jar I did recently.

Thursday 22 September 2011

Monday 19 September 2011

Lollie jar

So today, well actually this week I am trying to get some much needed gardening done.  Two days ago I created a nice new rock garden for our front entrance which I hope detracts from the lovely selection of unlevel areas of cement!!

Today didn't do much crafting, just spring cleaning in the kitchen of all those plastic and glass jars that I plan to hang from the tree (particularly around the treehouse) with fairy lights or tea light in them....Anyway they are mounting up under my kitchen sink so sorted them and when I saw an odd metal lid with a pretty heart, I realised I could make these pretty lollie jars I see.  I spray painted a silver plated candlestick holder yesterday, painted the lid the same colour today and found a plastic jar  that fit the lid (more likely to survive in this household) and.....


Here is a tray I painted turquoise and the candlestick before


I am really pleased with how it turned out and can't wait to use it, it now sits with spray painted blue sign that says "Cherish".....does that suggest I should cherish lollies.....OR cherish the moments when "frowned upon" bribes might just work with the kids, OR I think just cherish every moment.  I should even use it for myself and Daddy really as our treat!!!!

Have a great week.  We are off to camp out in our treehouse....me and three kidlets....should be fun!!!

Tuesday 13 September 2011

Doily stencilling Galore

I have seen lots of these gorgeous doily stencils and thought my little 5 yr old and I could give it a go yesterday.  Since doing the silhouette bag recently for my friend, I realised any acrylic paint should be fine to paint and just go for it!!!

I started with this Vinnies serving tray.  It was in perfect order until my 19 mth old dropped and broke it, but I think we can putty up the hole or something. 

Not pretty beforehand!!


I spray painted it white to start with


Then I put spray adhesive on the back of the doily to keep it still,...which then took the paint off (so either I did it too quickly or it may not be the solution)


And after a few touch ups to fix up the smudged white paint from the adhesive, here it is.  It is not as crisp as I would have liked, but I had to touch it up a few times and this took the crispness out of the design....but it will be fine for the kids to play with or have on a duchess.  There has always got to be a trial run, and I am happy enough with this one!


These are the doily placemats in the first stage. It was a bit hard for a 5 yr old to keep it in the lines, so I had to do the edges, but it will be a fun placemat for them. I just have to get my sewing machine fixed so I can sew it up.  I just have to find some pretty letters and cut them out of gladbake or something to stencil in the middle.

Monday 12 September 2011

Fashion Inspiration at Eat Drink Chic

I word...................GORGEOUS!!! 


It is so beautiful to see these gorgeous vintage inspired outfits, they are not just pretty colours and styles they are so flattering.

View all this and so much more at Eat Drink Chic

Things I am loving this week!

Well, to start with can I say, I love a LOT of stuff on people's blogs and this past week I have tried these sugar cubes....they are so cute, but you have to be very careful with how much water you put in to join the sugar cubes. I thought it would actually be (not just pretty) but a very practical thing to make a coffee in the morning.

DIY Sugar Cubes at "Nifty Thrifty Things"


I am also loving these chevron (zig zag) themed walls, but especially these quartrefoil stencilled walls are definitely my favourite and I am keen to give it a go in my bedroom.....one day!!!

Aqua stencilled wall at I Heart Naptime


Also these lovely Ice Cream Labels at Eat Drink Chic and all their other beautiful stuff.

Paint chip Lampshade

Ok, so I can't show you only the things that work out....this is another work in progress, so please forgive me for not having it completed before I show you.  Living out of town though, does limit the speediness of each project.

I saw this gorgeous lampshade recently on "The Sweetest Occasion", they have so much pretty stuff and have to say I rushed out to get the paint swatches immediately.  Thanks to the fun of facebook mobile, I get to see these things while I am actually in town!!!

  I have to say it is just the prettiest lampshade I have seen in ages. I did try to make the wool wrapped around the balloon lampshade ages ago, but had no luck with modge podge or glue keeping it strong enough. I did read recently that someone combines glue with flour and water....might try that one day, but to be honest the lovely red wool with pom poms through it is so saturated in wool, that is just doesn't have the same plush effect anymore.

So, when I saw this lampshade (and I have been collecting paint chips of late for garlands etc) I rushed out and grabbed the colours I was after and gave it a go.  Really I think with some amending it will be fine, (but I have to get to town to get more paint chips)

So here it is so far....

I have a 2 inch scallop circle cutter that I use for soooo many things, including this project.

I thought this was enough but I need another 4 rows of six

No embroidery hoop in this house currently, so a wire coathanger and some bending....???  It worked, so don't mock the look of it ok!


So this is it partially finished...the colours look too dark for my liking with the light on, but my 19mth old sweetie calls it pretty every morning, so until I get more paint chips this week and/or change the colour completely to the cascade of colours (am really liking the pink or perhaps aqua AGAIN!!!)  this is it.

I simply cut out some string and sticky taped the circle to the string then tied it onto the hanger.  The tuturial above I mentioned didn't leave gaps between the circle, but I think it works okay on this one....yet to be totally happy with the outcome though.


Sunday 11 September 2011

Green Buoy......oh boy!!!

Yep, painted the set of drawers today and got the kids to work on their own project so the top coat was a little smoother.


Obviously no handles yet....but do you think I could wait to show off my "Pop" of colour in the bedroom.  Will work on the handles next week.

I only used such a tiny smidgen of the Green Buoy (turquoise or teal) paint and it just dawned on me that is suits the colour of the lounge decor....WAHOOOOO!!!

This is what the kids painted....well one thing anyway...they painted about 10 other bits of scrap wood and an old pot, basically any old thing they could find.


We made the doghouse a few weeks ago and while it may not be a masterpiece of workmanship...I did it the best I could and it is cutesy....just need to sand the front of the roof back.

Hope you had a good weekend!

Saturday 10 September 2011

Secondhand Sideboard redoux

I found this silky oak sideboard or set of drawers this week at the secondhand shop for a good price.  It will fit perfectly into the corner of our room and help out with storage...perhaps it is my keenness to find vintage things,......but my closet just seems to be a lot fuller these days!  The set of drawers came with no knobs, but that is good, they probably would have been quite yucky and old.....so that leaves the design completely up to me.


So here it is in progress......I sanded it this afternoon and the kids and I painted it...I know "SCARY thought", but they were very keen to paint so I let them do the back and sides and then I just went over it.....I then moved the kidlets onto offcuts of wood to paint and an old pot.


This is the undercoat we did this afternoon.....guess what colour I plan to paint it tomorrow????????

Anyone guessed my favourite colour of the moment yet??

Stay tuned.............

Thursday 8 September 2011

Whooooaaa Cowgirl!!

I have been deliberating for ages about getting a very very special pair of beautiful tan boots to wear for Winter.....and I hadn't decided on whether I go modern or western until just recently.  I have tried neither on (until I bought my $4 pair from Vinnies) so knew no better when I bought these darling boots from Sheplers!  Unbelievably, they were a size bigger than I would ever wear, but with 50% off the last pair, I thought this might just be the moment to sieze.

Well checked at the post office today (rather anxious over their delivery) and "Yes, they have arrived,"  I am sooo excited and rang hubby straight away but just needed to show some girls.

Now they are a bit lairy on my foot, but I really really love them and they are a perfect fit, any smaller and they would not fit....they smell of beautiful leather and I am just r......a.......t.......h.......e.......r happy about the whole thing.  So here they are..........

They are very very WESTERN!!!!!!!!!!


So I reckon the poor folk in town might just see my coming, but alas I will be comfy, feeling sporty and happy to be there....so they will just have to take this western boho chic on board.

Sunday 4 September 2011

50s Vintage Cowgirl Hens Night

So we had the Hens Night on the weekend and I haven't been able to post any of the fun projects I have been doing until the surprise was out.

Here they are... we went with a Vintage 50's Cowgirl theme as the bride loves vintage and is a cowgirl....


This is one with our vintage labels....mine was "Incredibly enough,...I don't give a S..T!" Bit rude, but thought it was classic.  We had heaps of great labels, like "Don't Get Smart With Me!", "Coffee, Do Stupid Things Faster!" you get the idea.  I am threading the candy hearts onto strings in this piccie.


And I just had to pop one in of my $10 fur coat, that the hen chose not to wear and I was very keen to wear it for this fun vintage occasion.....It was sooo warm!!  Just had to pop this photo in of one of my bestest friends since Primary School....What a honey!


I made this little raggy heart for decor as the shower.


Then blew up a photo of the sweet couple and painted onto fabric with acrylic paint (did have three attempts at this because the photo was pixelated and so would definitely recommend getting a really clear good pic to get the silhouette just perfect.) 


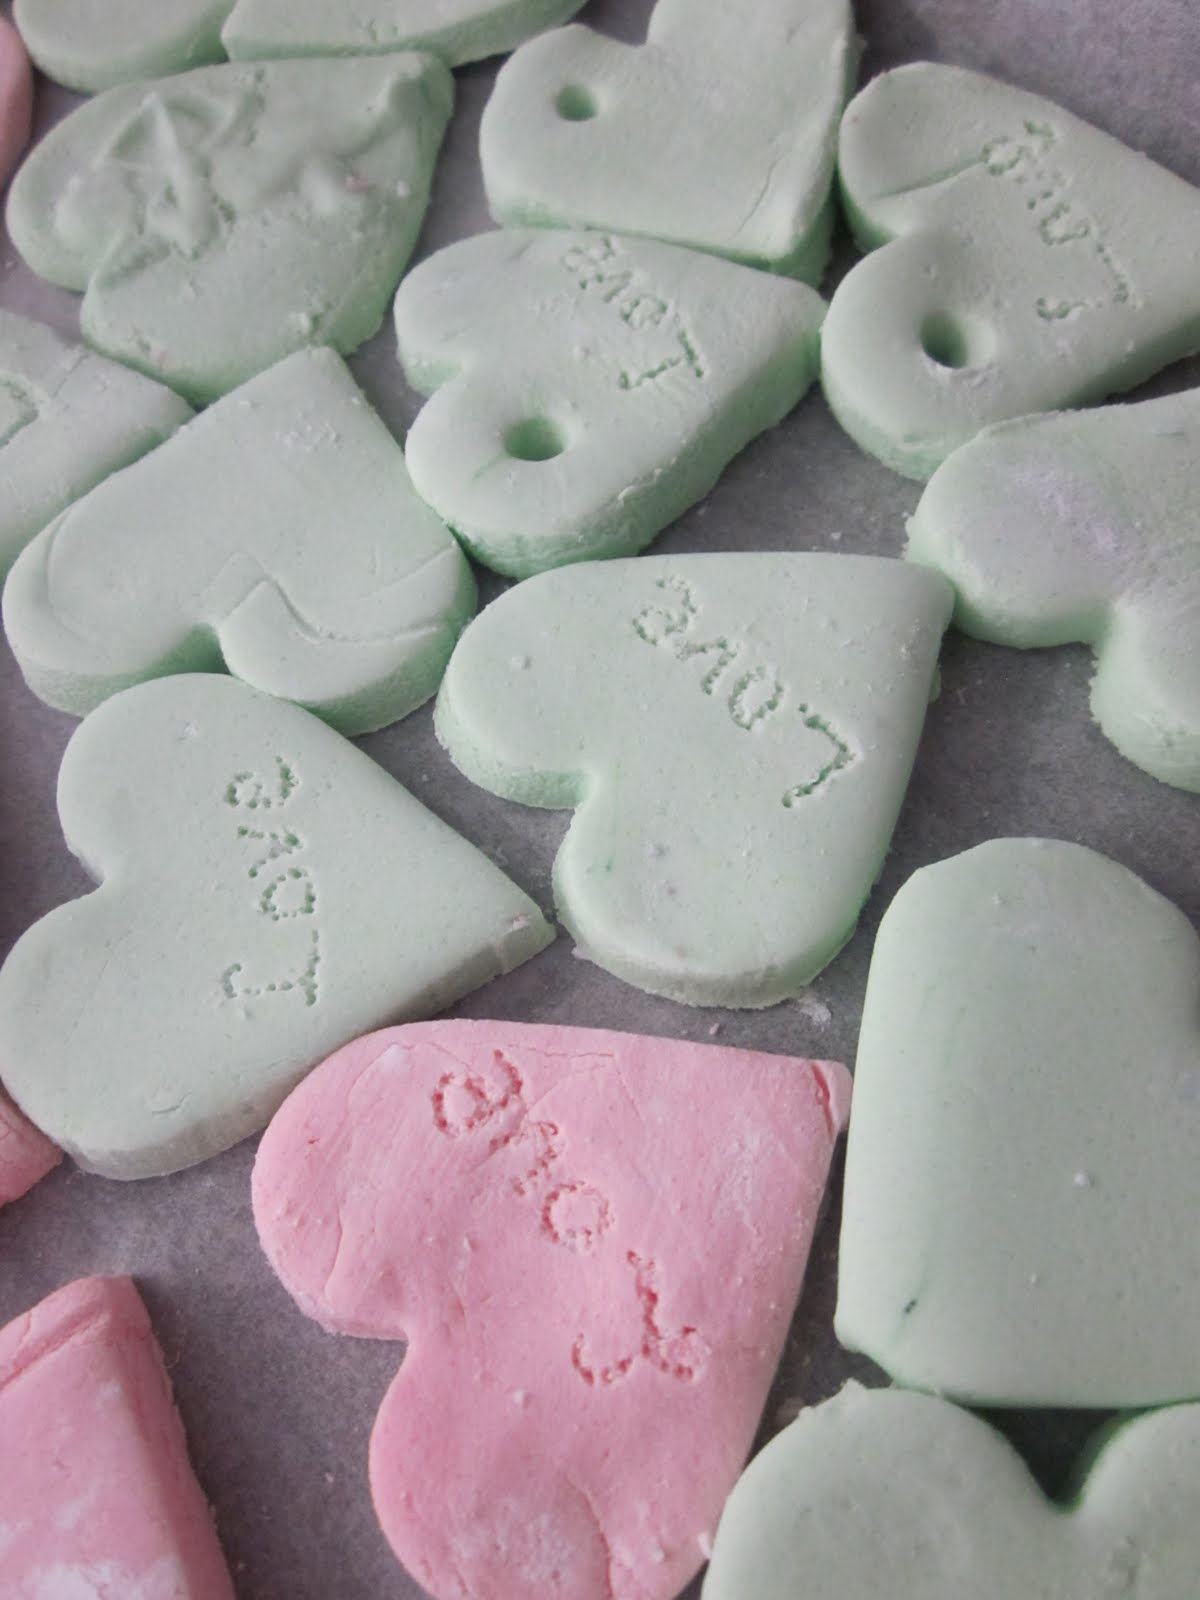
I made some cutesy (although not that little) conversation candy hearts for the shower and to wear around our neck at the hens party.  I had seen to write on the hearts with colouring, but time didn't allow and I don't think my lack of a steady hand would have worked,....so sort of punched in the writing I wanted with a skewer.


I thought they may be too sweet....but after that firecracker pasta a friend and I ordered....they were ABSOLUTELY PERFECT for settling some slightly hot lips!


I also found this cute little vintage man and wife at Vinnies and painted them white.

I wanted to make a vintage looking apron, so I found a gorgeous print, printed it onto transfer paper, ironed it onto calico (my printer did not work well at this even thought it is inkjet, the print wiped off if I touched it and is very pale....but Vintage......!!!! So I guess it worked out.  Then I blended the colours of the dresses that we planned to dress the bride in.


More photos will follow of our Vintage Cowgirl outfits....

Tuesday 30 August 2011

Silhouette sweetie

I have been loving silhouette's for such a while now and finally got around to giving it a go this week.

Here are the end results of some fun painting with my sweetie and I.  We will make the calico one into a library or homework bag...that will double as a handy bag at home.

I am thinking her little silhouettes will be great on school books in the bottom corner, instead of her name, a gorgeous little silhouette label... can't wait to do it.

This printout was done after I took the photo on cardstock, then cut out the piccie, then I scanned it and placed it into a frame, then printed it and spray painted a frame to match and it now takes pride of place on my sweeties ducchess.....later to be hung amongst her photo wall collage.


This is our original work, together we painted the calico, I did the outside lines and sweetie the inside.  I wouldn't do it on glossy photo paper again as the black ink came off into the paint and had to redo it.  Just print on plain card.


I couldn't help it, I recently bought transfers and had never used them and really wanted one on her shirt like I had seen on TomKat Studio with her little girl...so beautiful.  Obviously I need a laser printer and it comes out completed and powdery so if I touch the image, it wipes off....Anyone that can help with this would be a great help.  So this print on a tshirt to go with her pettiskirt and dec out later is quite washed out as you can see.

Boots Gone Western!

I bought these $4 boots at Vinnies a few months ago, and don't think I would actually wear them out black...not really my colour, so have been sitting waiting, wondering what I might do with them....


I covered them in tape and elastoplast  around the metal bits....I knew it would stay on properly.

Then hit the spray paint, with them hung on the clothes line.   It wasn't the tan I was after, but would have to do.


I hot glued some old tassles on and I have my brown western boots.

I have sent them Western!

Saturday 27 August 2011

Dollhouse furniture redoux

Now I loved barbies as a little girl, and always struggled with the fact that my sister did not love playing them anywhere near as much as I did....thank heavens for best friends!!

Anyway my eldest girl isn't really that into dolls, but all she wanted last year for her birthday was a dollhouse, so Daddy built her one, with the intention, that when she wasn't interested in it anymore it would work really well as shelving.

We are about to attach the roof, so piccies of the whole thing later...but yesterday we did a quick spray paint of some old my barbie furniture (Yes, I have kept every single barbie in mint condition and their beach and outdoor furniture....I said I loved them)

Here are the pics.  I found some old grinder boxes, really strong cardboard,..gave them a quick spray paint and they are the kitchen shelves
Before:
After: 

The old table of mine.

In it's new glory in the kitchen.  The mat is a cut up old bathmat that we dyed.

                   An old makeup case with a modge podged computer screen.
 

My old poolside set, pool missing, but pepsi bottle, esky, table, chairs and backdrop still fine